|
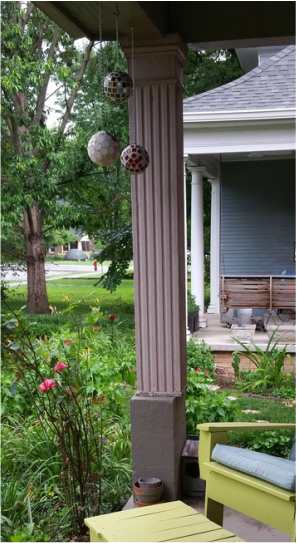
I am lucky enough to live in a very cool house in a very cool neighborhood in Nashville. The house was built in 1909 and like so many houses built during that period, it has a full length front porch. The porch was one of many things that spoke to us over 27 years ago when bought this house. The porch itself is concrete and has 4 columns across the front with 2 additional half columns on each end against the house. I don't know for sure that the columns are original, but believe that they are. Full length wood columns often would develop problems over time due to weather exposure. It's not unusual in older neighborhoods to see columns where the lower portion has been cut off and replaced with a different base. Sometimes the base was made with brick or stone or concrete and looks very stately and attractive. Sometimes the base was made from a few cinderblocks that were painted and that was that. By the time we found this house, the latter had already occurred. So, even though we never had the most attractive columns on the block, it was something I really just stopped seeing. Kind of like an occasional plaster crack or small cracked window pane in the back room. I mean, really, no one sees those things, right? Finally this year, the columns needed to be seen. It's still very much a work in progress, but they're coming along.
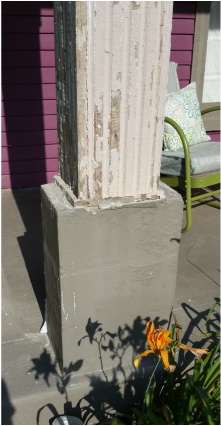
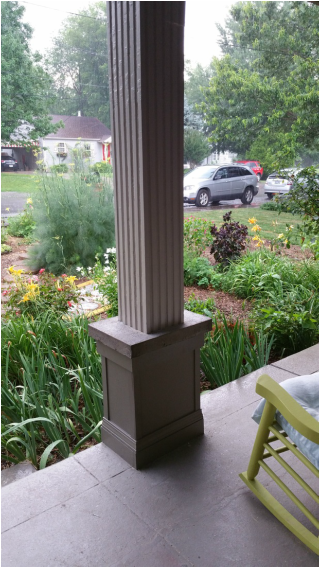 The first column makeover complete! The hardest part is removing several layers of paint from the column, particularly since the first however many layers were lead paint. I would love to say that I have good advice for how to do this properly, but I don't. I primarily used the least offensive chemical stripper I could find, but even after going over everything twice, there was a lot of paint still on the wood. I also used a heat gun. I can't find clear answers about heat guns and lead paint. I've read several places that it's safe because they don't get hot enough to vaporize the lead and then read that they do. Sigh. I do know that sanding is out...breathing lead dust isn't good. I did however try wet sanding for the first time as a final clean up and smoothing before painting and that worked pretty well. Bottom line, I reached a point where I decided it was good enough put the new paint on. Is it perfect? No. Am I OK with that? Yes!  Here's a close up of the new base. (I'll take and post pictures of the next one as I build it...this one was the design-and-learn-as-I-go base.) The steps are straightforward, but the execution took some time and patience!
First I built a box around the bricks. Just four sides, no trim. Next I built a "shelf" to close in the top, extending it about an inch beyond the size of the box enclosure. Then I built a mold for the concrete cap. I extended the bottom pieces of the mold another inch beyond the shelf and screwed it in from underneath. The I build 3" sides and screwed them in place. Mix and pour concrete. Wait a week. In the meantime, I attached the bottom trim. A week later...remove the mold (still being a little careful with the concrete since it's still curing), measure, cut, attach the top and corner trim. Caulk any gaps. Paint. Paint. Done!!!
1 Comment
Late Spring is my favorite time in Tennessee. It looks like wave after wave of Mother Nature rewarding us for being so patient all winter. Or at least for getting through it with as much grace as we can muster. The beauty is outrageous. I love the transformation. It comes with the happy fingernail ruining chores of planting and weeding and mulching...(clean and pretty fingernails are overrated, right?) It also comes with visions of new yard art dancing in my head...... Yard art. There are several outdoor projects underway at my house. The biggest two are giving my front porch a makeover and what I think of as the great paver project. The paver project actually got started with the broken bird bath that I wrote about a few weeks ago. (See pic of completed bird bath at bottom of this post!) I put the broken piece back in the mold and poured fresh concrete to fill the missing area and also filled it in and added some tile, making a very large (and very heavy) paver. 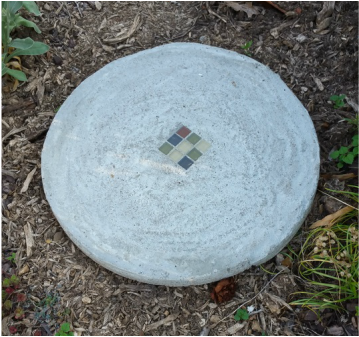 This is the point at which one thing led to another. Kind of like when taking out the trash leads to stopping at the garden boxes to pull 'just a few' weeds which leads to transplanting the volunteer tomato plant before it gets to big which leads to more weeding around where you just planted it, and then you have to turn the compost when you take the yard waste over to the bin, which reminds you that the compost can in the kitchen needs to be emptied which takes you right back by the trash bag that you abandoned in the middle of the yard 3 hours ago. Sheesh. Here's how it unfolded: these pavers are big...almost 2 feet in diameter...they define a walking path for sure, but also have a visual impact. I decided that I wanted 5 or 6 to make a new path from the sidewalk to the hose. I can cast one each weekend because I have only one trash can lid (mold) and I keep it in the mold for a week. It's so heavy, I don't want to risk breaking it. Here's the second one, still curing in the mold and not cleaned up yet: 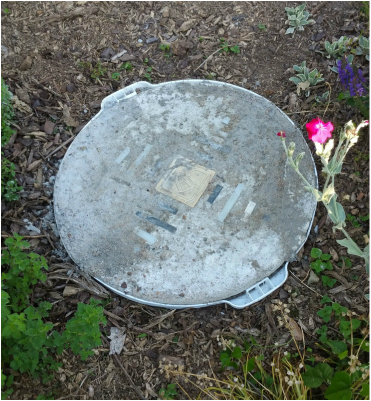 And then this thought...if I was going to put concrete and tile pavers on one side of the yard, surely I needed to put some on the other side, right? I decided to dress up a sitting area that had been a "rug" of small river rock and a bench by putting down a new rug. Kind of like replacing that classic, yet boring, off white rug with a contemporary carpet of colorful geometrics. 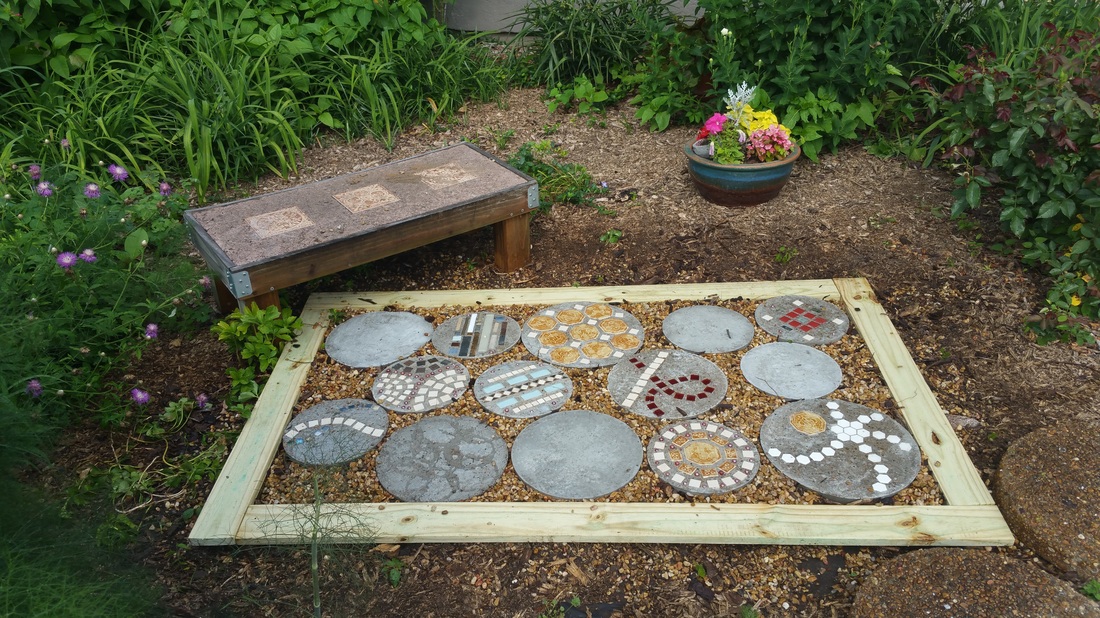 The solid concrete pavers will be acid etch colored in 2 or 3 more weeks. They need to cure for at least a month before coloring. It will also look more established once the frame weathers a bit. (And will look prettier once the homeowner--me--cleans up that bench!) The finished birdbath..... 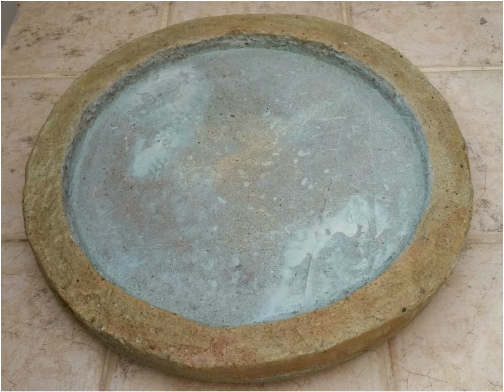 |

Hi, I'm Donna. Long time artisan/creative. Full time work in nonprofit world. Mother of two adult sons. Currently, also mother of two cats. Recent PostsThe patience project. Because patience is a virtue. And a creative challenge.
Don't mess with imperfection. How copper and heat speak for themselves. Politics and Art wage war inside me Write 100 words, take a nap and share your mantra Tile and wood floor...this year's winter project...kitchen renovation Archives
September 2018
Categories
All
|
 RSS Feed