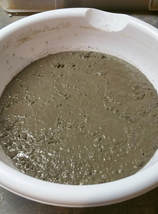
 It all started with small amounts of concrete leftover from larger projects. Stepping stones for the the yard. A bench. Learning to cast birdbaths or larger tabletops. I don't like to send anything to the landfill, including small amounts of leftover concrete. This was not an original idea, however at the time, I hadn't seen anyone else making these small concrete bowls. I also now mix concrete specifically to make bowls of different sizes, but starting with the little ones is so easy! The instructions below will cover the process for small ones and larger ones...there are only some small differences. Here we go: 1. A word about concrete. I have never worked with quick setting concrete. It might be a faster, easier way to get a finished product, but it's typically mixed with large pebbles and because it does set quickly, it wouldn't be amenable in terms of carving and shaping edges. I mix my own using 1 part Portland Cement to 3 parts sand. The ratio is not precise. You'll find recipes that are 1:2 and recipes that will contain additional materials. I use either play sand, which is very fine and leaves a smooth surface or all purpose sand, which may have slightly larger pebbles, but fine enough to still have a smooth surface. Mix with water until it's the consistency of thinnish icing. Again, this is not a thing to be fretted over. It needs to be thin enough to not hold air pockets that would leave a lumpy surface and not so thin that a ton of water rises to the top. A little water rising to the top after it's poured into the mold is fine. 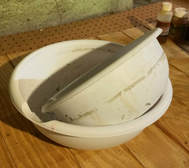 2. Spray the inside of the larger plastic bowl with cooking oil or a mold release product and the outside of the smaller one. Plastic, not glass. A glass bowl or other mold, even sprayed, will almost never release the concrete.
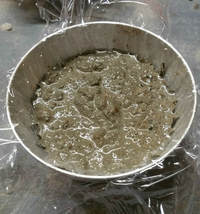
3. Pour the mixed concrete into the bowl, leaving enough room for displacement when the interior mold is pushed in.
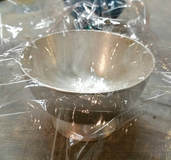
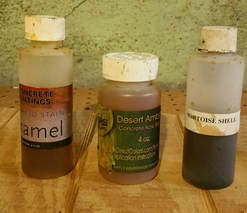
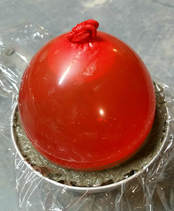 4. Using either a water balloon for a small bowl or a slightly smaller plastic bowl for a smooth exterior bowl, sprayed with same cooking oil or release agent on the outside, make sure it's centered and push into the concrete. (I have had success, once, using a glass bowl as an interior mold. I tried it because of the design in the glass. I sprayed the heck out of it and miraculously was able to remove it with a minimal...uh, moderate...amount of cursing. The design was perfect and it looked amazing. Once it was cured and stained, a friend wanted to buy it. I carried it to my car one morning on my way to work so I could meet her that afternoon. Having my arms full, I set it on top of my car while I loaded in my gym bag, lunch bag, stack of work things and purse. I then got in my car...having that nagging feeling that should never, ever be ignored, and drove away. I realized about half way to work that the vague weird noise I'd heard several minutes back was the bowl sliding off the roof and onto the street. Damn. Damn. Damn.) 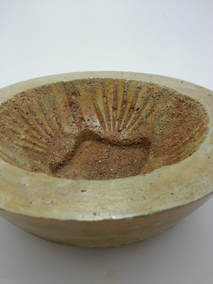 Pretty, wasn't it? 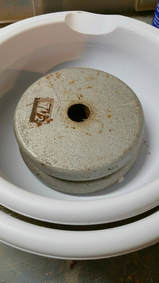 5. Small bowls may not need weighting in the top bowl, but medium or larger bowls will. Any balanced weight will work...a can of soup, a container filled with water, or (weirdly) free weights you may have laying around...something like that. Sand and rocks can also work but are messier. 6. Don't touch anything for 24 hours. Really. Nothing catastrophic-probably-will happen if you do, but just don't. 7. OK, now take the interior part (bowl or balloon or whatever you've used) out and look at it. Not really because you need to, mostly because you'll really, really want to. 8. Either put the interior mold right back where you took it from or fill up the interior area with water. You need to keep it wet and leave it alone for two more days. Trust me. Concrete cures better and stronger if it's kept soaking wet for at least 3 days. 9. Three days after the initial pour, you can unmold it. Carefully. It won't take much work at this point to crack or break it completely. If the mold is stubborn in terms of letting it go, just gently pull on opposite sides of the bowl, rotating around several times. It will eventually let you push it out from the bottom. 10. If you want to smooth off the top or carve a design, now is the time. However, this stage will somewhat surprisingly last for a few days depending on the size of your project...the more concrete involved, the more slowly it will become too cured to carve. I always smooth off the top and dull the edges a bit. I use an old wood chisel. I've learned over time that sharp edges on small bowls are likely to chip with regular use. (If you want to carve, use fine sand in mix. Even small pebbles will pop out and make your carving less precise.) 11. Now we're back to leaving it alone. Let it completely dry. Concrete continues to cure forever really, but will do that majority of curing in the first 30 days. So leave it alone for 30 days if you can. At least 3 weeks. Time passes... Next, think about color. There are concrete dyes that can be used in the first step, when mixing a batch of concrete. My experience with dyes is that while they do change the color of the concrete, they don't result in crisp color. This makes sense when you consider that the base color being changed is gray. Black dye results in darker gray and reddish/terra cotta dye resulted, for me, in a muted, if not muddy, mauve color. Meh. My preferred method of coloring the bowls is acid etching dyes. I've always loved the look of acid etched concrete floors. My concern initially was thinking that I'd have to buy a gallon of each color I wanted to try. I started looking around online and discovered a couple of companies offer sample packs...usually 8-12 colors in 4 oz bottles for about $35. Here are three links: www.directcolors.com, www.concretecoatingsinc.com or www.fabcrete.com (which is still $25 for 12 samples!). Each bottle will dye many, many bowls so your money will go a long way. The concrete needs to have cured for 30 days. I'm fairly certain this has to do with the concrete being at the correct Ph for the chemical interaction with the stain. Since the stains are designed to result in particular colors, it's important for the chemical reaction to be correct. Having said that, I will also confess that I've experimented with staining at 3 weeks and it's been fine. I tend not to be a hard core ruler follower, but if you are, wait 30 days. The process is simple...brush on a color and let it sit overnight or at least 8 hours. Then wash the bowl in a baking soda and water bath to neutralize the dye. When the bowl completely dries again, you're ready to seal it. Unless you want to play around with more colors...they can be layered for a deeper color. The concrete will continue to react to subsequent applications of the dye. Just remember that the color, once sealed, will look like it did when the piece was wet. There are many concrete sealers available and you can use any of them that don't say for exterior use only. They come in different finishes, much like paint. I like a glossy finish, but have discovered that some are glossier than others. I end up applying two or three coats. There are also some food safe waxes and coatings available but I'm not familiar with those specifically. If you try your hand at this, I'd love to see pictures!
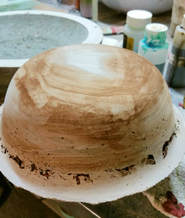
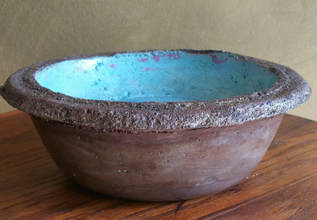 This is the finished bowl from the above right. 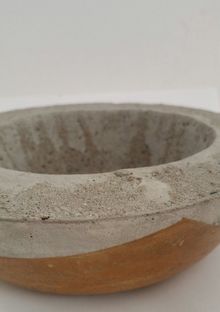 This is a color block pattern from taping off the bowl before staining. 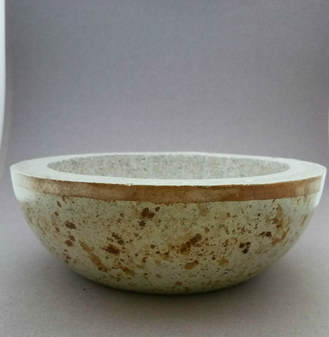 This design is from taping off the border and splattering the stain. 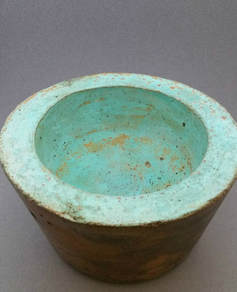 This was a solid wash of color...who knows why concrete reacts the way it does? 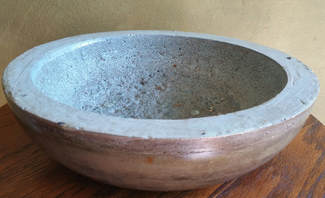 I added extra pebbles to the bottom of this bowl...looks really pretty. 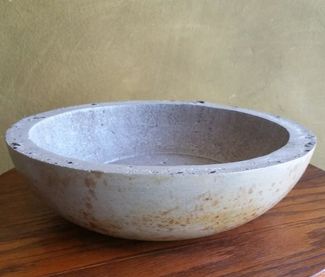 More splatter. I love this size bowl...almost a foot across and 3 or 4 inches high.
1 Comment
Sally
7/29/2017 08:38:39 pm
These are so pretty! Thanks for the great instructions. Maybe some day... Leave a Reply. |

Hi, I'm Donna. Long time artisan/creative. Full time work in nonprofit world. Mother of two adult sons. Currently, also mother of two cats. Recent PostsThe patience project. Because patience is a virtue. And a creative challenge.
Don't mess with imperfection. How copper and heat speak for themselves. Politics and Art wage war inside me Write 100 words, take a nap and share your mantra Tile and wood floor...this year's winter project...kitchen renovation Archives
September 2018
Categories
All
|
 RSS Feed